Sunday, August 7, 2011

I May Be Moving...

I may be moving over to Tumblr for good...

Please view my newest recipe here:
Tortellini Salad

Saturday, May 14, 2011

Non-Food Post

For an intimate look at my huge weekend news, check out my non-food blog:
I Got a Fi-Ancy Now!

Saturday, April 30, 2011

Quiche: *brunch at its best* [or any meal]

When I was younger, I used to think those  mini frozen quiches people whipped out at parties that usually came with spinach or just cheese were the highlight of those nights.  Thankfully, I grew up a little and realized home-made quiches can taste much better and allow the chef to be so much more creative.  Really, quiches can be made with any ingredients your imagination can encompass...knowing taste profiles helps you to put together tons of veggies, meats, and spices you already have on hand.

Today, I decided to try something brand new and I'm so glad that I did...


Bacon Crab Asparagus Quiche (Crustless)

You will need:
*serves 6-8 for a light brunch, or 4 people as part of a dinner*

  • 3 - Eggs
  • 1/2 cup - Mayonnaise (you can sub sour cream or greek yogurt, or a mix of any of these)
  • 1/2 cup - Milk
  • 2 TBS - Flour
  • 1/3 cup - Bacon - crumbled
  • 2 - 6oz. cans White Crab (feel free to buy the fresh shellfish if your wallet can take it)
  • 3/4 cup - Shredded Swiss Cheese (or sharp cheddar, or whatever you like)
  • 1/3 cup - Pico de Gallo (this is  a personal pref: chopped tomato, green pepper, green onion, cilantro)
  • 1 Tsp - Old Bay Seasoning (or garlic powder)
  • 1 Tsp - Hot Sauce
  • 1/2 Tsp - Red Pepper Flakes
  • Dash of Salt and Pepper
  • 12 - Asparagus stalks
  • Shredded Parmesan for topping (optional, please only use freshly grated)


Step 1:

  • Whisk/Beat Eggs, Mayo, Milk, and flour together.  Combine until there are no more lumps visible.  Add in all other ingredients and beat until completely combined.


Step 2:

  • Pour mixture into a well greased pie plate.  If using a pie crust, gently roll crust into plate first then add egg mixture.


Step 3:

  • Cut off dry end of Asparagus.  Rinse and shake dry.  Then carefully lay each stalk into the plate anyway you desire.


Step 4:

  • Bake at 350 for 45-50 minutes.  Every now and then this recipe is finicky.  Be sure to have a golden browning of the top of the quiche and test with a knife before removing from oven.


Enjoy this delectable treat for a weekend brunch or serve with soup or salad for a wonderful dinner.

Saturday, March 26, 2011

Mini Turkey Burger Sliders + Oven Baked Fries with Sea Salt

Originally, I had high hopes for this Saturday.  Actually, there are a lot of Saturdays that I have high hopes for, but not many live up to my expectations.  Whose fault is that?  Well, mine of course.  Sleeping in after a long week of teaching is always more tempting than getting up early to run errands.  Having said that, I had plans to go to Target, Khols, grocery shopping, and drop off dry cleaning.  Here it is 4:30pm Tulsa time and I'm still wearing sweats as a cheap black headband is trying its best to hold back my ever-growing frizzy hair out of my face.

Don't worry, we have plans tonight to see Exceptional Synergy at the Tulsa PAC at 8pm, so I'll have to get dressed eventually...

I did want to make something fun to eat, but having previously explained my comfy clothes and apartment kept me from going shopping.  Hence I thought for a bit about what I had in the apartment already...and came up with what turned out to be a really cute late lunch/early dinner.


Mini Turkey Sliders


You will need:
*Serves 4 for lunch*

  • 1.2 lb - Ground Turkey (it usually comes in this weight)
  • 2 TBS - Italian Bread Crumbs
  • 1 - Egg
  • 1 TBS - Cumin
  • 1 TSP - Paprika
  • 2 TSP - Minced Garlic
  • 2 TBS - Parmesan Cheese (Freshly grated)
  • 2 TBS - Italian Flat Leaf Parsley (freshly torn)
  • 1 1/2 TBS - Soy Sauce
  • 15 - Shakes of Worcestershire Sauce
  • Salt and Pepper


  • Cheese of your choice (I had left over slices of Mozzarella)


Steps

  • Combine all ingredients in a medium size bowl with your hands.  

Until this past Monday, I had always been a little freaked about about mixing meat with my hands and just didn't like it.  However, this  Monday I made meatball subs for dinner at Tony's mom's house and somehow it was an OK experience.  Even though I washed my hands several times after finishing, I think because the meatballs turned out so wonderful, I found the experience rewarding.  Therefore, this afternoon, I just rolled up my sleeves and let the meat have it :)


  • Form little burgers, about the size of the inside of your palm and fry in a skillet on Medium/High heat that's been sprayed with cooking spray, or a little olive oil if you like.  Once you can see that the underside is cooked nicely and the meat starts to look "cooked" on the outside half way up the sides of the little burgers, you can flip them.


  • Wait for a minute or two, then add the cheese of your choice to the done side of the burger.  I had left over Mozzarella slices from the meatball subs, so I used those.   One slice torn into fourths could cover four little burgers.


  • Then top your skillet with the lid and allow the burger to finish cooking and the cheese to melt.  Usually once the cheese has really melted down the sides, the burger is finished.


I served mine in mini potato rolls with a dollop of sour cream and left over pico de gallo (chopped tomato, onion, cilantro, green pepper).  I'm sure they taste yummy with ketchup, mustard, and pickles as well :)


Over Baked Fries with Sea Salt


You Will Need
*Serves Four*

  • 4-5 - Russet Potatoes
  • 1/4 Cup - Oil (Can be Olive or Canola)
  • 1 TBS - Oil
  • Sea Salt 
  • Black Pepper 


Steps

  • Preheat Oven to 475˚F
  • Cut Potatoes in half lengthwise, then lengthwise again, so it should now be in long quarters.  Cut each quarter into two or three pieces, depending on how thin you want your fries.
  • Put all potato spears into a medium size bowl.
  • Cover with hot water for 10 minutes.
  • Drain potatoes and dry with a kitchen towel.  Also, dry the bowl they were just in and add the potatoes back into it.
  • Add 1 TBS Oil to bowl with potatoes and freshly ground seal salt and black pepper, mix carefully (or just cover and shake up a bit).
  • On a flat cookie sheet that has a slightly raised border, pour the 1/4 cup of oil.  Tilt the pan so that the oil is evenly dispersed. 
  • Add freshly ground sea salt and black pepper evenly over the oil.
  • Place each potato spear on one side, (not the skin side), in one layer on the sheet.  If your sheet is not big enough, do not overlap potatoes; you may need to use two cookie sheets--it's important that the can crisp up a bit on the outside.
  • Place the pan in the preheated oven for 15-20 minutes.
  • Take out and use tongs to flip over every fry.
  • Replace in the over for another 10 minutes.
  • Watch to make sure they do not brown too much.


Sprinkle with more sea salt if desired, or don't if you're trying to be healthier.  Honestly they're still pretty enjoyable without the added salt.  I did grate a bit of parmesan cheese I had in the fridge over some of them and they were pretty awesome :)


Hope your 
lazy Saturdays can be just as delicious.

Monday, March 14, 2011

First time...

This week, I made Panna Cotta for the first time.  This amazingly rich Italian dessert is so incredibly easy.  I will share the recipe as soon as I try a second "flavor" later this week.  
I want to give you options.  Here are two servings from this last week:

Zucchini Bread

The first time Zucchini Bread made an impression on me, I think I was in junior high.  My family was eating at a "special" restaurant for reasons that I can't remember.  We ate dinner that night at The Pub, located in Camden, NJ near the Airport Circle.  I'm not saying I'd never had Zucchini Bread before that night where we ate in extremely dim lighting with flickering candles at each table.  However, this is the moment that has forever stood out for me as the beginning of my love for the bread.  I loved its darkish, rich color.  I loved its texture, even the nuts, which I've only become a real fan of since living in China.  Because of that night, I have loved going to Mimi's Cafe here in Tulsa.  In their little bread basket that each table receives upon being seated are two big dinner rolls, two pieces of French bread, and two pieces of Zucchini bread.  Mimi's serves it with freshly whipped butter, although Zucchini bread can stand alone in my opinion.

Over the last few months, I have tried my hand at making this delicious bread myself.  I have thrown a few surprise items in there now and then (like pineapple), but have decided on a master recipe.  This recipe is one that I've altered from a recipe I found on allrecipes.com.  I'm so glad to share this with you all today and encourage you to make it yourselves since it is so easy.  It makes a great breakfast or item to serve with tea or coffee in the afternoon...


Zucchini Bread

You will need
*Servings depend on how thick you slice*

  • 3 Cups - All Purpose Flour
  • 1 Tsp - Salt
  • 1Tsp - Baking Powder
  • 1Tsp - Baking Soda
  • 1.5 Tsp - Cinnamon
  • 3 - Eggs
  • 1/2 Cup - Apple Sauce (with Cinnamon if you want)
  • 1/2 Cup - Vegetable Oil
  • 1 Cup - White Sugar
  • 1 Cup - Brown Sugar
  • 3 Tsp - Vanilla Extract (I used Mexican Vanilla)

  • 3 - Zucchini Shredded (I shred two finely, then the third I shred the biggest; do not drain)
  • 1 Cup - Walnuts (use more if you want a nuttier bread)


*Preheat oven to 325 F*
*Grease two loaf pans* (Add parchment or wax paper if you desire to take out the entire loaf with ease when cool).

Step 1: Sift/Whisk through Dry Ingredients
Add flour, salt, baking powder, baking soda, and cinnamon to a medium size mixing bowl.  You can sift these together or use a whisk to sift through.  (Many recipes call for more cinnamon, but I'm not that big of a fan in this bread so I only use 1.5 tsp and use apple sauce that has cinnamon already).

Step 2:  Cream Wet Ingredients
Add eggs, apple sauce, vegetable oil, white sugar, brown sugar, and vanilla to a large mixing bowl.  Cream together all wet ingredients.

Step 3:  Add dry to wet
Add all dry sifted ingredients to bigger mixing bowl of wet items.

Step 4:  Stir in Zucchini and Walnuts
Sometimes I use the mixer to make sure the zucchini is thoroughly distributed through.  Then stir in your walnuts last.  

Step 5:  Bake
Pour evenly into two prepared loaf pans and place in oven for 50 minutes.  Depending on oven, it may take up to 10 minutes longer.  

When finished, place pans on wire racks to cool for at least 10 minutes, then if desired, you can take out of pans to finish cooling on their own.  Keep leftovers in plastic wrap in the fridge.


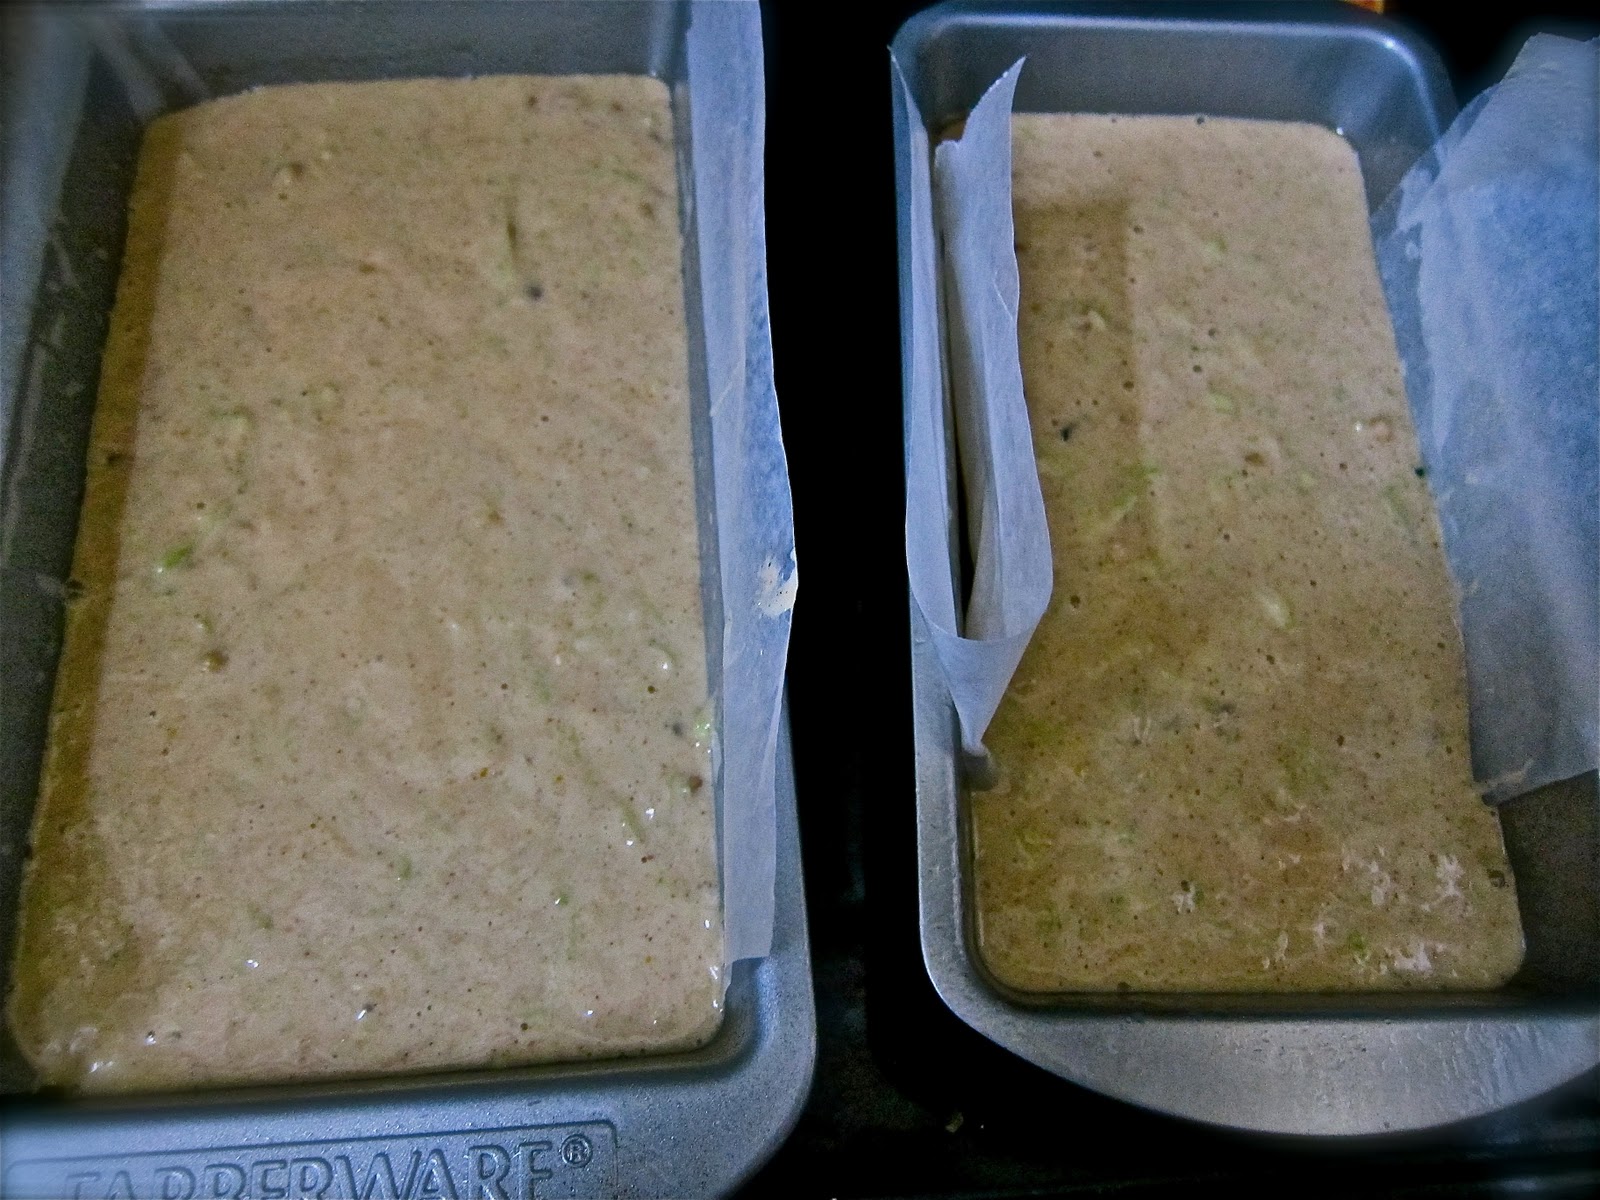
Side notes:  My experiment bread a few months ago where I added I can of drained pineapple tidbits gave a very sweet bread, that I probably should've cooked longer than the "master recipe" here.  I have also thought about throwing some shredded coconut in as well and I think it would be an interesting addition.  If you use this recipe and add your own flair or serve as is, let me know...
(I have enabled comments so that anyone can now leave a note:) ).


Sunday, March 6, 2011

A Family Feeds Their Love...

After the dear family I wrote about last night read my blog, Trisha shared an old photo of me around their family's dinner table.  The Italian father of that family passed away when I was in high school and it left a void in all of the neighborhood kids' hearts.  I am very grateful to have known this family all my life through, to have shared in their love and food, and to now have this picture to cherish as well.  Trisha shared her father's mantra with me, saying, "A family feeds their love by sitting together and eating at the table, even if it's only a tuna fish sandwich."  I am determined to carry that motto with me when I begin my own family.  This blog is really about me becoming a woman and finding what it means to take care of a home and the people I love by feeding them--in every way.
Me, front and center in the Miragliuolo's dining room

Saturday, March 5, 2011

Habichuelas: The ULTIMATE Puerto Rican Comfort Food

When my parents first married and then brought me into their lives, they lived in what had been my mother's townhouse in Burlington City, NJ on St. Mary's Street.  If you're unfamiliar with the East Coast, town homes or row homes are quite common.  Usually, they are at least three floors, but can be quite skinny houses that are connected to many others on the same street.  Therefore, there is no side yard or much of a front or back yard for that matter either, especially my mother's.  I am told it was very small and the three of us had quite a time living there.  Therefore, soon after, my parents purchased a plot of land on a newly bought larger space of land that a church had recently gained and was in the process of selling individual lots for families to build a home on.  My parents were one of the first and the house they would build there would be the house I called home for the next sixteen years of my life, and truly the house I will always think of as "home."

There was a beautiful family that lived near my mother on St. Mary's Street in Burlington City who shortly after "followed" her to Fountain Boulevard in Burlington Township.   This family bought the plot next door to us and built a home around the same time.  I grew up calling the parents of this Italian-Puerto Rican family Uncle John and Aunt Judy.  Their daughter, Trisha, a few years older than I was, babysat me numerous times and thankfully was one of the first to teach me what to do with my seemingly rebellious, frizzy curls.  As a child and teenager, there was nothing finer than going over to the Miragliuolo's home for dinner, especially around the holidays.  Uncle John, the Italian of the family, with his dark olive skin, raven black arm hair and shiny hair and mustache would sing Frank Sinatra tunes as he made what seemed like the entire neighborhood smell like Italian Roast Pork.  His petite wife, Judy, the Puerto Rican from New York, would bring out her fresh salads with avocado, Arroz con Gandules, and the superior Puerto Rican specialty--Pasteles.  The dinners I enjoyed there were followed by lots of laughter, extra time around their upstairs kitchen, then the walk downstairs to watch sporting events on TV with the neighborhood kids.  I know every kid that grew up on our block enjoyed the cooking of these two ethnic foodies who stuck to the basics of what made their nationality's food great.  John and Judy always welcomed anybody in, especially the kids, and lavished upon us the best kind of love--the one that comes in fresh Italian rolls or needs a little hot sauce.  Once I entered high school and all the thoughts of my future and a knowledge that I would not forever live next to these amazing people started to dawn on me, I started asking if they would teach me how to cook something--anything so that I could have a piece of my childhood and tradition to take with me no matter where I landed one day.  The simple dish I am bringing you today is the first dish they taught me.  I have tweaked it over time and don't use measuring cups or spoons at all while making it, but I will do my best to tell you how to re-create the meal for yourself.  I should warn you that I've never met a Puerto Rican who makes any national dish the same way as any other Puerto Rican--there is always at least a little difference between chefs.

Arroz con Habichuelas y Chuletas

You will need
*Serves four*
  • 1 TBS Extra Virgin Olive Oil
  • 2 TBS Sofrito (look below for explanation)
  • 2 - 8oz tins Tomato Sauce
  • Water - fill 1/2 of an empty tomato sauce tin
  • 2 - 14.5 oz tins Pink Beans
  • 2 - pkg Sazon
  • Spanish Olives - about 1/3 - 1/2 cup (depending on your taste; also be sure that you pour some of the liquid from the olive jar in as well)
  • 2-3 Russet Potatoes - diced

  • 2 cups white rice
  • 3 1/2 cups water

  • 1lb Pork Chops - boneless, thin cut
  • 1/4 cup White Wine Vinegar
  • 2 TBS Extra Virgin Olive Oil
  • 2 TBS Sofrito
  • 2 - pkg Sazon
  • 2 TBS (Goya) Adobo Seasoning
  • Oil for cooking

Step 1:  Season the Meat
Take chops (chuletas) out of the packaging and put into a very large ziplock bag.  Pour the White Wine Vinegar in and close the bag.  Move around the meat with the Vinegar (many Hispanics do this to "clean" the meat).  You can then pour most of the vinegar into the sink.  Keeping the chuletas in the bag, add the EVOO, Sofrito, Sazon, and Adobo.  Seal the bag securely and place in the fridge to marinate for 1/2 an hour or so.

Step 2:  Arroz
Because the Habichuelas are the star of this meal, the rice is simply prepared as White rice.  Using a rice cooker or regular pot, follow your rice bag's instructions on making.  You could add a package of sazon for every 2 cups of rice you put in the pot, but it's really not needed in this dish.  Make sure to get the rice going so that everything will be done at once.

Step 3:  Habichuelas
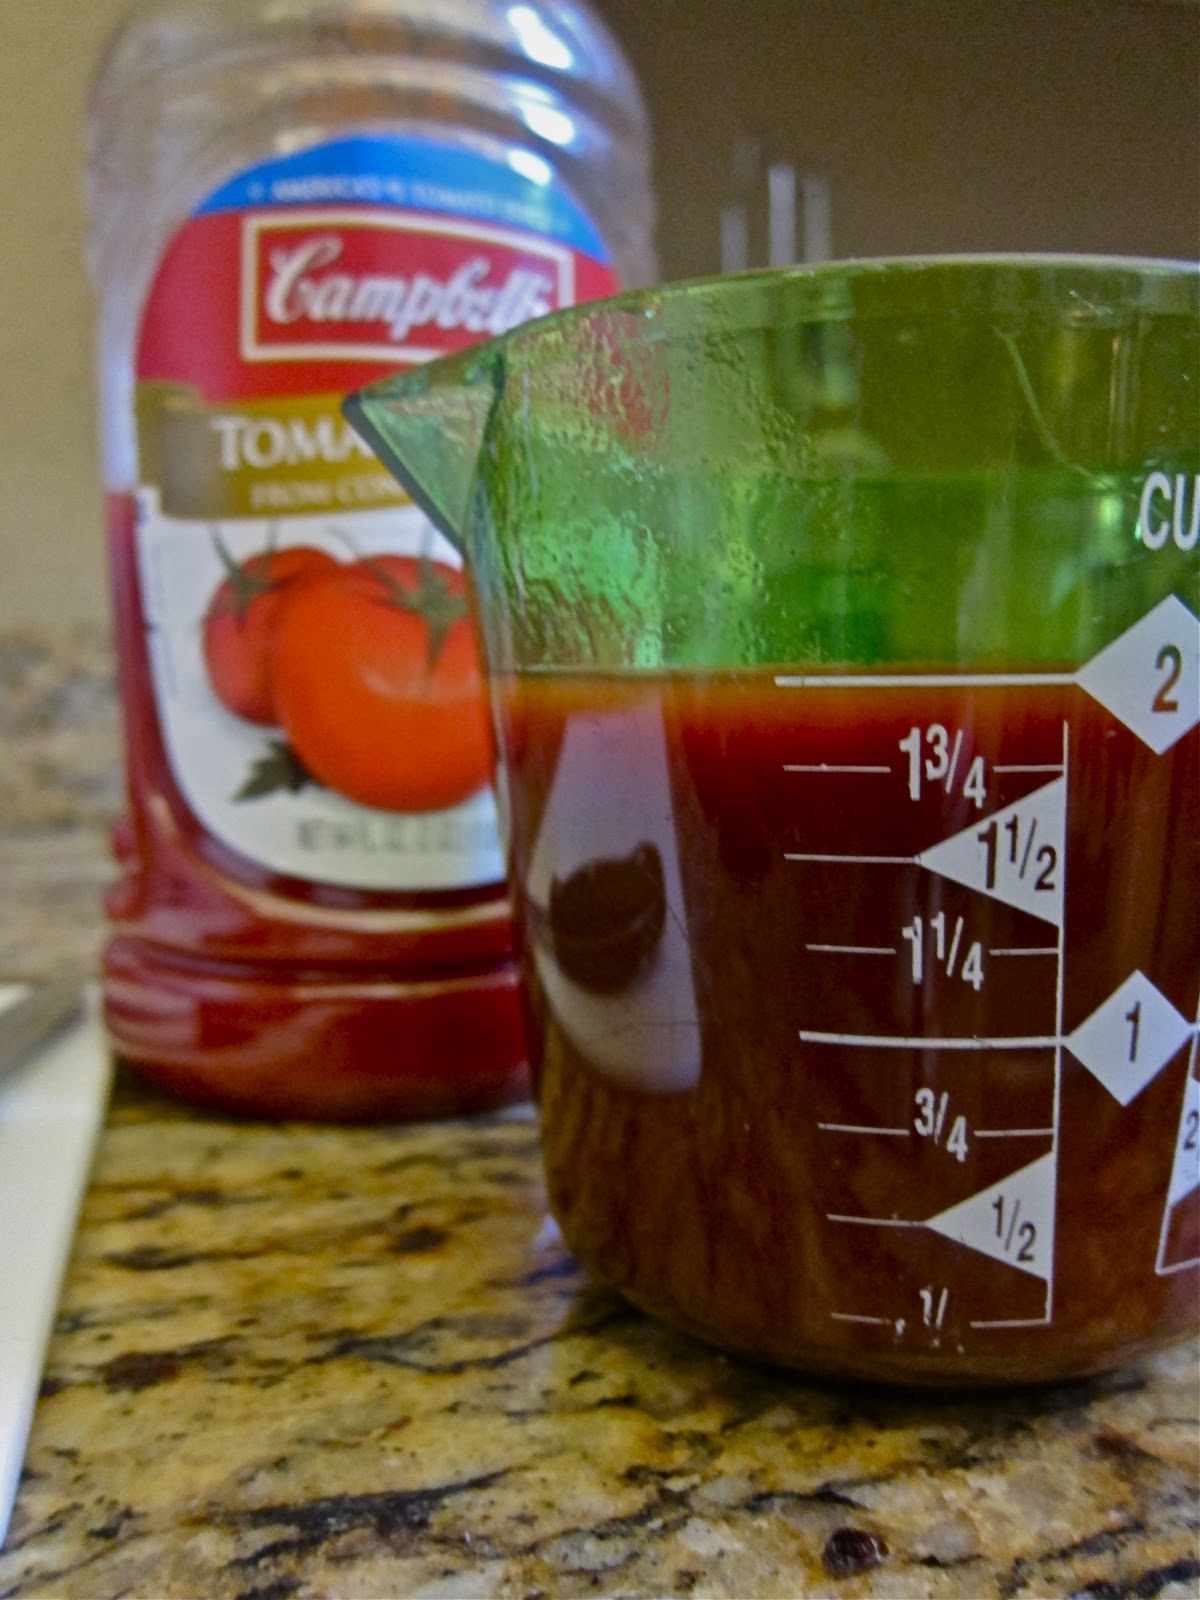
Once your rice has started, using a medium size pot, add the TBS EVOO and the 2 TBS Sofrito.  Turn the burner to Med-High  Allow that to cook until fragrant, then add both tins of Tomato Sauce + 1/2 a tin of water.  Allow the sauce to come to a simmer so that the Sofrito totally incorporates into the sauce.  Next, add both packages of Sazon and mix well.  After draining and rinsing the beans, add them to the sauce mixture.  Next add the olives + the liquid from the jar.  If you do not think you see "enough" olives in the pot, you can add some more.  Don't worry, I'm not a big Spanish Olive fan, but in this dish--they are part of what gives it its overall taste.  Now that all necessary flavor items are in, add the diced potatoes.  You want the potatoes to soak up all the flavor of the sauce while they're cooking.  They should be orange-y by the time the Habichuelas are finished.  Bring the pot to a light simmer, put on the lid, and let it cook until the potatoes are cooked through (they can retain a bit of a bite; you don't want mush).  You can now see that this has a very stew-like quality...I said it was comfort food :)

Step 4:  Chuletas
While your Habichuelas are simmering, add a very small layer of oil to a large pan.  You can use more oil if you intend to "fry" your chops, but a lot of times, I just cook with a little oil.  Turn the heat onto Med-High and wait for it to heat up.  Once your pan is hot, you can add the chops that you have been marinating one at a time.  Make sure to lay the meat "away from you" when you put each one in the pan so that you are not burned by sizzling oil.  Add as many as will fit in your pot neatly in a single layer.  (Feel free to stir the Habichuelas while the chops are cooking).  Cook about 4 minutes on each side.  If you have more chops than will fit into a pan at one time, heat your oven to 220 F in order to keep your finished chops hot while others are cooking.  Continue cooking in the same oil until all are finished.


Hopefully, by this time the rice and beans are just about done.  The beans can be served on top of the rice or put to the side so that each person can decide how to mix it in.  My boyfriend is a big fan of chopping up his chuletas and mixing them in with the rice and beans.

There you have it, Puerto Rican Comfort Food at its best!  Salud!


**Note about Sofrito**
Do NOT buy the Goya brand "Sofrito" in the store for this recipe.  That product is not very authentic and will NOT produce the same taste.  If you are unfamiliar with Sofrito and do not know any PR who would have their own stash, then buy the Goya Recaito instead.  Goya Sofrito is reddish, orange, while Goya Recaito is a definite green.  Go for the green, much closer to the actual taste you should achieve.  I am working on my own Sofrito recipe that should be up soon.  But hey, if you're in the Tulsa area and are feeling like you just need to make Habichuelas for yourself, email me and I'll give you a few cubes (I freezed mine that my friend made me in ice cube trays and then threw the frozen cubes in a bag.  Great way to store).

Friday, March 4, 2011

Puerto Rico, My Heart's Devotion

Growing up in Jersey had lots of perks.  One being that both of my parents came from what I like to think of as that "good, old school, East Coast" breed.  Both love jazz music, black and white movies, and musicals.  Though there may not have been much else that my parents agreed on, I can't deny that both instilled in me and my brother a real love of the classics.  It's no wonder that I prefer to watch Danny Kaye, Jerry Lewis, and Humphrey Bogart when I'm homesick or that Ella Fitzgerald, Louis Armstrong, and Duke Ellington can just make a bad day feel "right" again--even from the first note of one of their pieces.

Having said that, as a little girl, my mother told me the plot of the film, West Side Story, years before I would ever watch it.  This version of forbidden love a lá Romeo and Juliet really rocked my world when I first watched it.  Though it has definite variations from the Shakespearean tragedy that it draws heavily from, it still speaks of young passion, the sacrifice that love demands, and people struggling for their place in the world.  Even though the female protagonist of the film (Natalie Wood) is not a true Boricua, I still loved that movie a lot when I first watched it.  Living on the East Coast (I make these comparisons because living in Tulsa, OK for any amount of time will teach you that not everyone's experiences are the same, though they may be from the same country), taught me a great respect for all cultures, a fascination with traditions, and a desire to celebrate in various ways.  A certain pride is still quietly present in me at times that there is definite Puerto Rican blood (even if only visible in my dark curls) within me.

My friend, Joya, performed what she (and I) know as a "real labor of love" for me yesterday.  Any Puerto Rican reading this post will know exactly what I mean when I tell you what she did; she made Sofrito for me...

What is Sofrito?  Well, if any of you readers have ever had the pleasure of eating authentic Puerto Rican food before, you know then of the amazing flavors that are introduced to your palette with every bite and that inevitable question that is formed on your lips to ask, "What is this incredible taste?" Sofrito is the base for all Puerto Rican dishes, usually the first thing that goes in the pot to simmer with the olive oil to get things started before any other ingredient is added.  Without Sofrito, many Puerto Rican dishes would lack their almost Caribbean sabor.  


I have not yet worked out my own tweaked version of Sofrito, but I am working on it.  As soon as I find one that I am confident in, I will post it for all of you foodies to try, especially if you've never attempted Puerto Rican food yourself.  Let me inform you, it is not a cousin to Mexican, or any other "Hispanic" food you may be accustomed to.  Puerto Rican food is much more akin to most Caribbean cuisine.  So, now that I am fully stocked with a massive amount of Sofrito (you usually only need a tablespoon or two), I am ready to share my first very, very personal Puerto Rican recipe, one that I've been making for 10 years that was passed down to me.

Tomorrow, I will be cooking Arroz con Habichuelas y Chuletas.  Please check again in the evening for pictures, ingredients, and the full recipe.  In my opinion, this dish is the ultimate Puerto Rican comfort food.

Until then, Salud :)


Mi Abuelo dancing...

Tuesday, March 1, 2011

Creamy Tomato Basil Soup

Thinking of my childhood, I have fond memories of my mom making tomato soup and grilled cheese sandwiches.  I loved dunking my bread oozing with cheese into the tomato soup and having those flavors blend in my mouth.  Often, I would only eat enough of the soup for my sandwich to be dipped several times and not want to consume the rest.  Why not?  Well, the reason is simple:  my mother* made canned tomato soup.  I know that there are some moments when canned is OK (perhaps beans, crushed tomatoes, corn, etc.).  However, I have come to the conclusion that soup is not one of those food items that should be canned.  Think back to the momets that you've enjoyed a really good soup (or stew).  Maybe you've relished it while you were sitting in a café with a couple of friends, or when it was the first course in a delicious meal at a great restaurant, or perhaps when you were feeling under the weather and a friend or relative dropped by with chicken soup made from a "family recipe."  On those ocassions, it wasn't a canned soup that warmed your heart, but something that took someone time to make.  Over the course of the last year, I've attempted making many soups from scratch and have decided it can be a real labor of love.  From the moment you start simmering your vegetables or preparing a broth, to the moment you ladle your concoction in the bowls, a smell fillls your home and your senses prepare to be warmed.


One of my favorite soups, prior to learning how easy it is to make myself, to order in a café is Cream of Tomato Basil, or Tomato Basil Bisque.  This soup takes me back to those childhood day of sitting on my livingroom floor (we didn't use the kitchen/dining table much), watching a 90's sitcom and dunking hopefully endlessly my cheesy sandwich into the bowl.  However, even without dipping material, this soup is delicious.  This is one I can eat without any added substance and it can fill and warm me up.

The ingredients and directions are so simple, if you've never tried this soup before and have great memories of tomato soup like me, it is a must!

You will need:
*serves four*
  • 4 cups Tomato Juice (Any brand will do; I'm partial to Campbell's - which usually has 8 cups total, so often  I double the recipe to use up the bottle at once)
  • 6 Tomatoes (You can mix and match.  I usually use 2 on the vine and 4 Roma)
  • 15 Basil Leaves (Do not skimp on the basil; this is crucial)
  • 1 cup Heavy Cream (Again, a usual small container of cream has 2 cups, so double the recipe if you have a bigger family)
  • 1/2 cup Butter (1 stick) (Sometimes I do less if I've trying to watch the fat, but honestly, this is an indulgingly rich soup, so go for it if you can!)
  • Salt and Pepper to taste (I always use garlic salt)


Steps:

1.  Peel/Seed the Tomatoes
  • To Peel:  Make a cross pattern in the bottom of a tomato.  Using tongs, submerge the tomato into boiling water for 1 minute.  Take out and the skin will come off where you made the slits. (I did not do this the first few times I made the soup, not a huge difference if you want to skip)
  • To Seed:  Cut the Tomato in half horizontally.  Then you can just use your paring knife to cut the seeds from the "ribs" of the tomato and  "scoop" them out.

    2.  Place the tomatoes (you don't have to cut them any more if you don't want to) into a medium stock pot. 

    3.  Pour in all 4 cups of your juice and turn the stove on to Medium. 


    4.  Allow the stock to come to a slight boil and let the tomatoes simmer for at least 30 minutes (the longer you let it simmer the more pronouced the tomato flavor.  Make sure to stir occasionally so that pulp doesn't cake around the sides of your pot.

    5.  Once the stock has simmered long enough, you can start blending with the basil leaves.  This can be done by using an immersion blender (If you're luckier than I am) or using a regular blender in batches. 
    • *Special Note:  If you are unfamiliar with blending hot liquids, there are precautions that MUST be taken:  Use a clean dish towel to cover the "drop" hole at the top of your blender.  This allows steam to escape.  Otherwise, if you close the hole w/ the plastic insert, the entire lid will blow off from the steam trying to get out and your kitchen will be a tomato pulp mess, or worse, you will get burned! (This note may or may not be due to personal experience)*

    You can blend all of your basil leaves at once, or if you are using a regular blender, add them in segments with your soup.  Using a slotted spoon to grab larger tomato pieces is helpful.

    6.  Once the soup has reached your desired consistency through out, return the pot to the burner.

    7.  Bring the soup back to a slight simmer.

    8.  Add the butter and cream.

    9.  Once the butter has completely melted and the cream has totally incorporated, add salt and pepper to your liking.


    10.  Enjoy this creamy soup with texture so rich, you'll be asking yourself, "Is that velvet?" (Maybe someone will get the reference?)


    I have also used left over Creamy Tomato Basil Soup for the cream base of Vodka Sauce when making pasta.


    *My Mother:  I want to make sure that everyone knows my Puerto Rican-(who knows what else) mother, Mary, is an amazing baker and cook.  Hopefully, eventually, one or two great recipes I grew up enjoying will make it to the site, though I have my doubts since my family's very secretive, especially about cookies :)  She is an amazingly hard-working single mom who has given up more than anyone else I know to give my brother and me a future and hopeful outlook.  Though soups may not have been her "thing,"  her other dishes and desserts more than make up for our experience with canned tomato soups :)